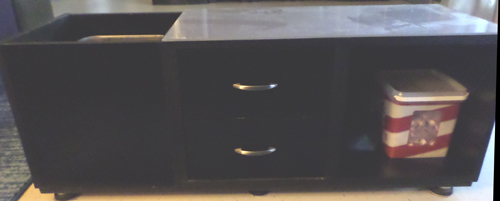
 This coffee table with spot for a wastebasket on the left and open space for blanket storage on the right was made with cubes. Foremost was the brand I preferred to work with, but alas they are no longer on the market. I used 2 open cubes at either end, with the wastebasket spot turned with the back down. Used a cube with drawers that they offered for the center and added my own handles to dress it up. Screwed the 3 parts together, then screwed the whole unit onto a piece of MDF board at the bottom. I then added small feet to help the unit glide across the floor. You can use furniture feet to make the height you want. I like to use handles from Cool Knobs & Pulls, and feet from Outwater. This coffee table with spot for a wastebasket on the left and open space for blanket storage on the right was made with cubes. Foremost was the brand I preferred to work with, but alas they are no longer on the market. I used 2 open cubes at either end, with the wastebasket spot turned with the back down. Used a cube with drawers that they offered for the center and added my own handles to dress it up. Screwed the 3 parts together, then screwed the whole unit onto a piece of MDF board at the bottom. I then added small feet to help the unit glide across the floor. You can use furniture feet to make the height you want. I like to use handles from Cool Knobs & Pulls, and feet from Outwater.
I then had a piece of acrylic from my local small hardware store cut to fit the top 2 cubes. I painted the back of the acrylic silver. Then set it on top with glue dots. Custom coffee table that fits with my decor. |
| |
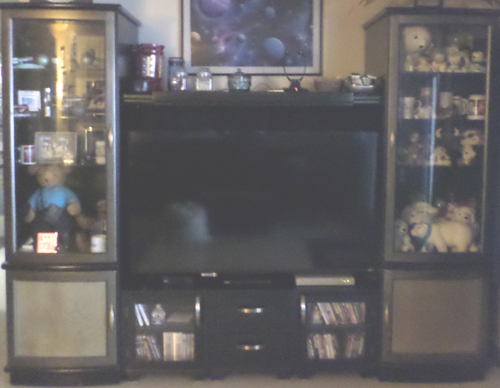 I turned this second hand plasma TV console into a big screen TV unit by constructing the bottom center unit. It had the 2 towers and the upper bridge. Again with my favorite cubes! 2 cubes with a door and the center cube with drawers. These cubes came with low wooden feet, so I used those. Handles from Cool Knobs & Pulls again for that custom look. I've had a few folks who say that center piece looks like it came with the entire unit. I turned this second hand plasma TV console into a big screen TV unit by constructing the bottom center unit. It had the 2 towers and the upper bridge. Again with my favorite cubes! 2 cubes with a door and the center cube with drawers. These cubes came with low wooden feet, so I used those. Handles from Cool Knobs & Pulls again for that custom look. I've had a few folks who say that center piece looks like it came with the entire unit. |
| |
 More cube ideas are the 2 cube tower on the right made with cubes with doors and the sparkly glass effect is provided by fluorescent light covers carefully cut to size. More on the light covers below with my tub surround. More cube ideas are the 2 cube tower on the right made with cubes with doors and the sparkly glass effect is provided by fluorescent light covers carefully cut to size. More on the light covers below with my tub surround.
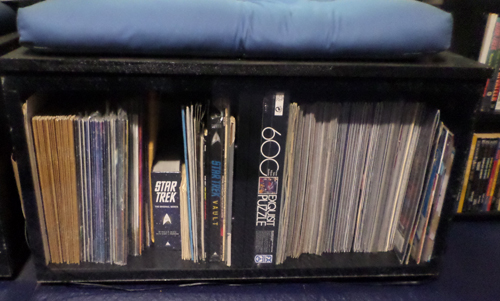 I have multiple storage stools like this one to the left. 2 cubes with a cushion on top and an acrylic front that is affixed by velcro to keep the contents clean yet easy to get to when needed. Extra seating and storage, now that's what I call functional! I have multiple storage stools like this one to the left. 2 cubes with a cushion on top and an acrylic front that is affixed by velcro to keep the contents clean yet easy to get to when needed. Extra seating and storage, now that's what I call functional!
|
| |
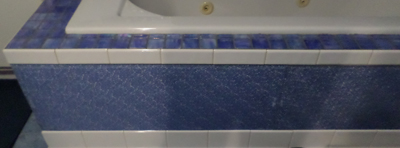 This tub surround is actually fluorescent light covers. These light covers from any home improvement store are usually 2 feet x 4 feet and great for screening things you don't want seen. You cut them to size by GENTLY running a utility knife multiple times until the material is cut through. Too much pressure and it will crack rendering it useless. You can then paint the back side to whatever color you desire. These panels are held in place by velcro. This tub surround is actually fluorescent light covers. These light covers from any home improvement store are usually 2 feet x 4 feet and great for screening things you don't want seen. You cut them to size by GENTLY running a utility knife multiple times until the material is cut through. Too much pressure and it will crack rendering it useless. You can then paint the back side to whatever color you desire. These panels are held in place by velcro. |
| |
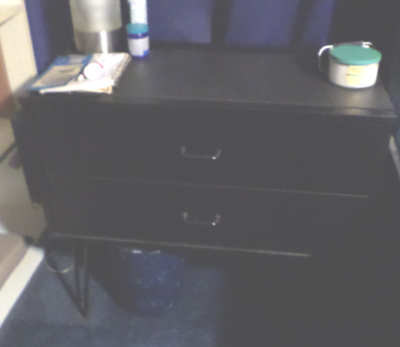 Both my husband and I needed nightstands with drawers for meds with open space underneath for slippers, a wastebasket and easy cleaning. As usual I couldn't find anything on the market. Amazon to the rescue! I found the ClosetMaid 1568 Stackable 2-Drawer Horizontal Organizer in Espresso and put 4 legs from Outwater on each unit. Quick and easy night stands! Both my husband and I needed nightstands with drawers for meds with open space underneath for slippers, a wastebasket and easy cleaning. As usual I couldn't find anything on the market. Amazon to the rescue! I found the ClosetMaid 1568 Stackable 2-Drawer Horizontal Organizer in Espresso and put 4 legs from Outwater on each unit. Quick and easy night stands! |
| |
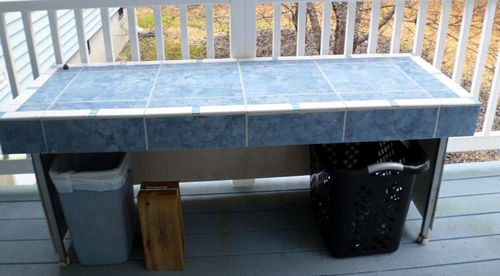 I recently had to give away this tile table I made. Absolutely loved it, it was my first attempt at tile work, but it was too heavy for us to handle anymore. It was a long, skinny table I picked up at a school surplus auction. I attached a sheet of plywood on the top and tiled it with leftover bits of tile I had. The surround to keep water out of our recycle bins was fiberglass board cut to size and attached with velcro. The coolest part of this table was the little blue tiles around the perimeter, they glowed in the dark! A happy accident when I ordered some tile from Cool Tiles for use in the bathroom. They have great tile selection and I've always been happy with their products. I recently had to give away this tile table I made. Absolutely loved it, it was my first attempt at tile work, but it was too heavy for us to handle anymore. It was a long, skinny table I picked up at a school surplus auction. I attached a sheet of plywood on the top and tiled it with leftover bits of tile I had. The surround to keep water out of our recycle bins was fiberglass board cut to size and attached with velcro. The coolest part of this table was the little blue tiles around the perimeter, they glowed in the dark! A happy accident when I ordered some tile from Cool Tiles for use in the bathroom. They have great tile selection and I've always been happy with their products. |
| |
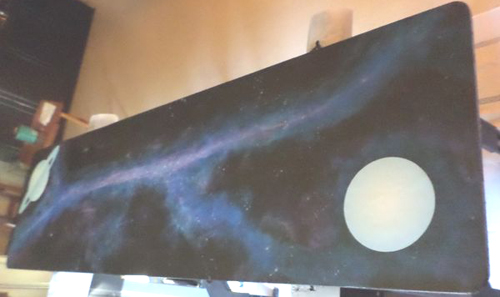 The tile table has been replaced with my latest creation, the nebula table. I took a 18 inch wide birch board, painted it black and then did the nebula painting using a sponging technique. The planets are glow in the dark stick-ons since I'm not talented enough to draw that well. Multiple coats of water based polyurethane helps protect it from the weather and the legs are 27 inch hairpin metal legs from a vendor on Etsy. The tile table has been replaced with my latest creation, the nebula table. I took a 18 inch wide birch board, painted it black and then did the nebula painting using a sponging technique. The planets are glow in the dark stick-ons since I'm not talented enough to draw that well. Multiple coats of water based polyurethane helps protect it from the weather and the legs are 27 inch hairpin metal legs from a vendor on Etsy. |
| |
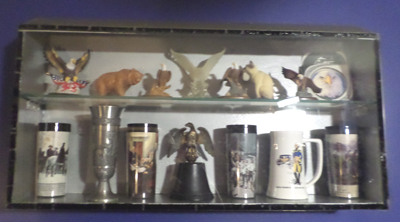 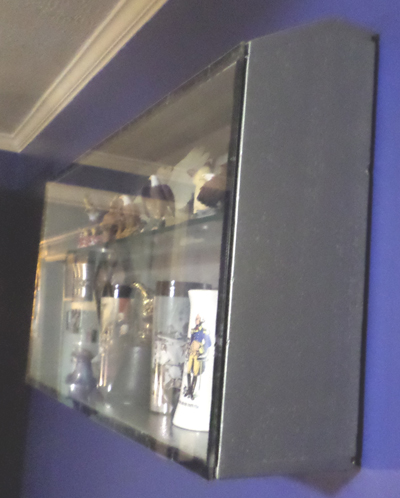 Now we get to the display cases. If you've ever priced display cases for your treasures and collectibles, you know the prices are crazy high. Since both my husband and I have collectibles, we needed a way to store them to cut down on the constant dusting. This case was actually a cabinet end I found at a surplus store. Turned on it's side it made a cool display. A little hammered metal paint, a glass shelf and a custom cut plexiglas panel attached with velcro finished this display. Now we get to the display cases. If you've ever priced display cases for your treasures and collectibles, you know the prices are crazy high. Since both my husband and I have collectibles, we needed a way to store them to cut down on the constant dusting. This case was actually a cabinet end I found at a surplus store. Turned on it's side it made a cool display. A little hammered metal paint, a glass shelf and a custom cut plexiglas panel attached with velcro finished this display. |
| |
 Bookcase Display Cases Bookcase Display Cases
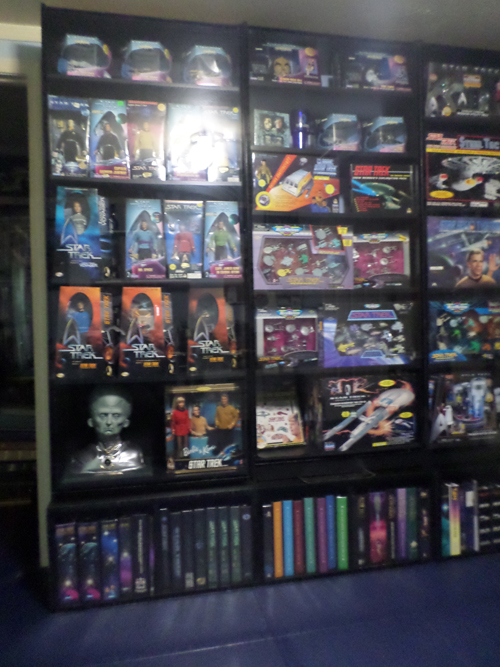
This display system is made of a row of cubes on the bottom, topped off by bookcases. Use bookcases that have a flat front for attaching velcro. Paint the bookcase whatever color you like, keeping in mind that velcro is generally either white or black. Buy your velcro in 25 foot rolls, you'll need it! Get plexiglas cut to size. I prefer it from my local small hardware store because they don't charge for the whole sheet if I need small pieces like for the cube fronts. Attach either the hook or loop velcro to the perimeter of the bookcase and use small nails to help keep the it in place. Pull the protective sheet off the plexiglas, clean the perimeter with window cleaner, let it dry and then attached the other velcro half to the plexiglas. Load in your collectibles and place the plexiglas in place. No more dusting collectibles!
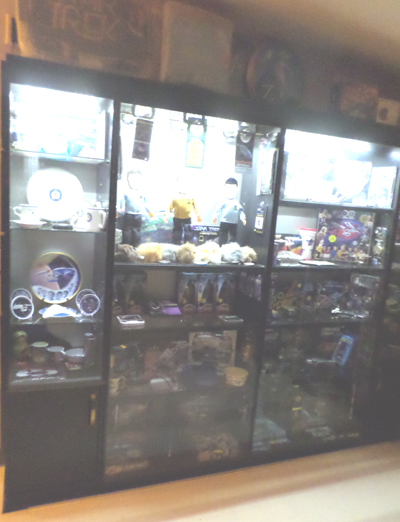 I have done a variant of this with a bookcase system I bought second hand, used glass shelves supported by metal frames (custom made at local hardware store) and installed led lighting across the interior top. I have done a variant of this with a bookcase system I bought second hand, used glass shelves supported by metal frames (custom made at local hardware store) and installed led lighting across the interior top.
This velcro and plexiglas system allows you to turn any flat faced box into a display at a fraction of the cost of commercial display cases. I've also used on display boxes I have built for various collectibles. |
| |
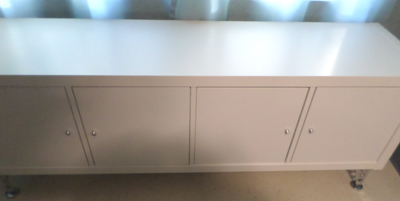
Then there is always modifying an Ikea product. I just added fancy legs from Outwater to turn this Ikea piece into seating & storage that's easy to clean under.
 |
